Your First Blankly Algorithm
Overview
Let's analyze RSI (Relative Strength Index). It is a common oscillator that is used to indicate whether or not an asset is overbought or oversold by analyzing the average price gains and losses for a given time period.
Want to see what you'll make by the end of this? Check this out
The Buy/Sell Condition
The RSI typically has two bounds set: an upper bound of 70 and a lower bound of 30 (see Investopedia). Specifically, when the asset hits below 30, then we want to buy in, and when the asset hits above 70, we want to sell.
Setting Up Your Environment with Blankly
To get up and running, all we have to do is install blankly and initialize our directory.
Installation
$ pip install blankly
Linking with Blankly Slate (Platform)
If you're using the platform (there's a free plan), then you'll get more access to backtest metrics, results, visualizations, and the ability to easily deploy live. We'll easily login here.
$ blankly login
Initializing Directory
Now, all we need to do is initialize our directory and follow the prompts to get all set up (if you're using Blankly Slate, feel free to create a new model here called "RSI Bots")
$ blankly init
Adding Alpaca Keys
We're going to use Alpaca for this tutorial, but feel free to use whatever you'd like. The video below links how to set up Alpaca keys with Blankly
Implementing in Blankly
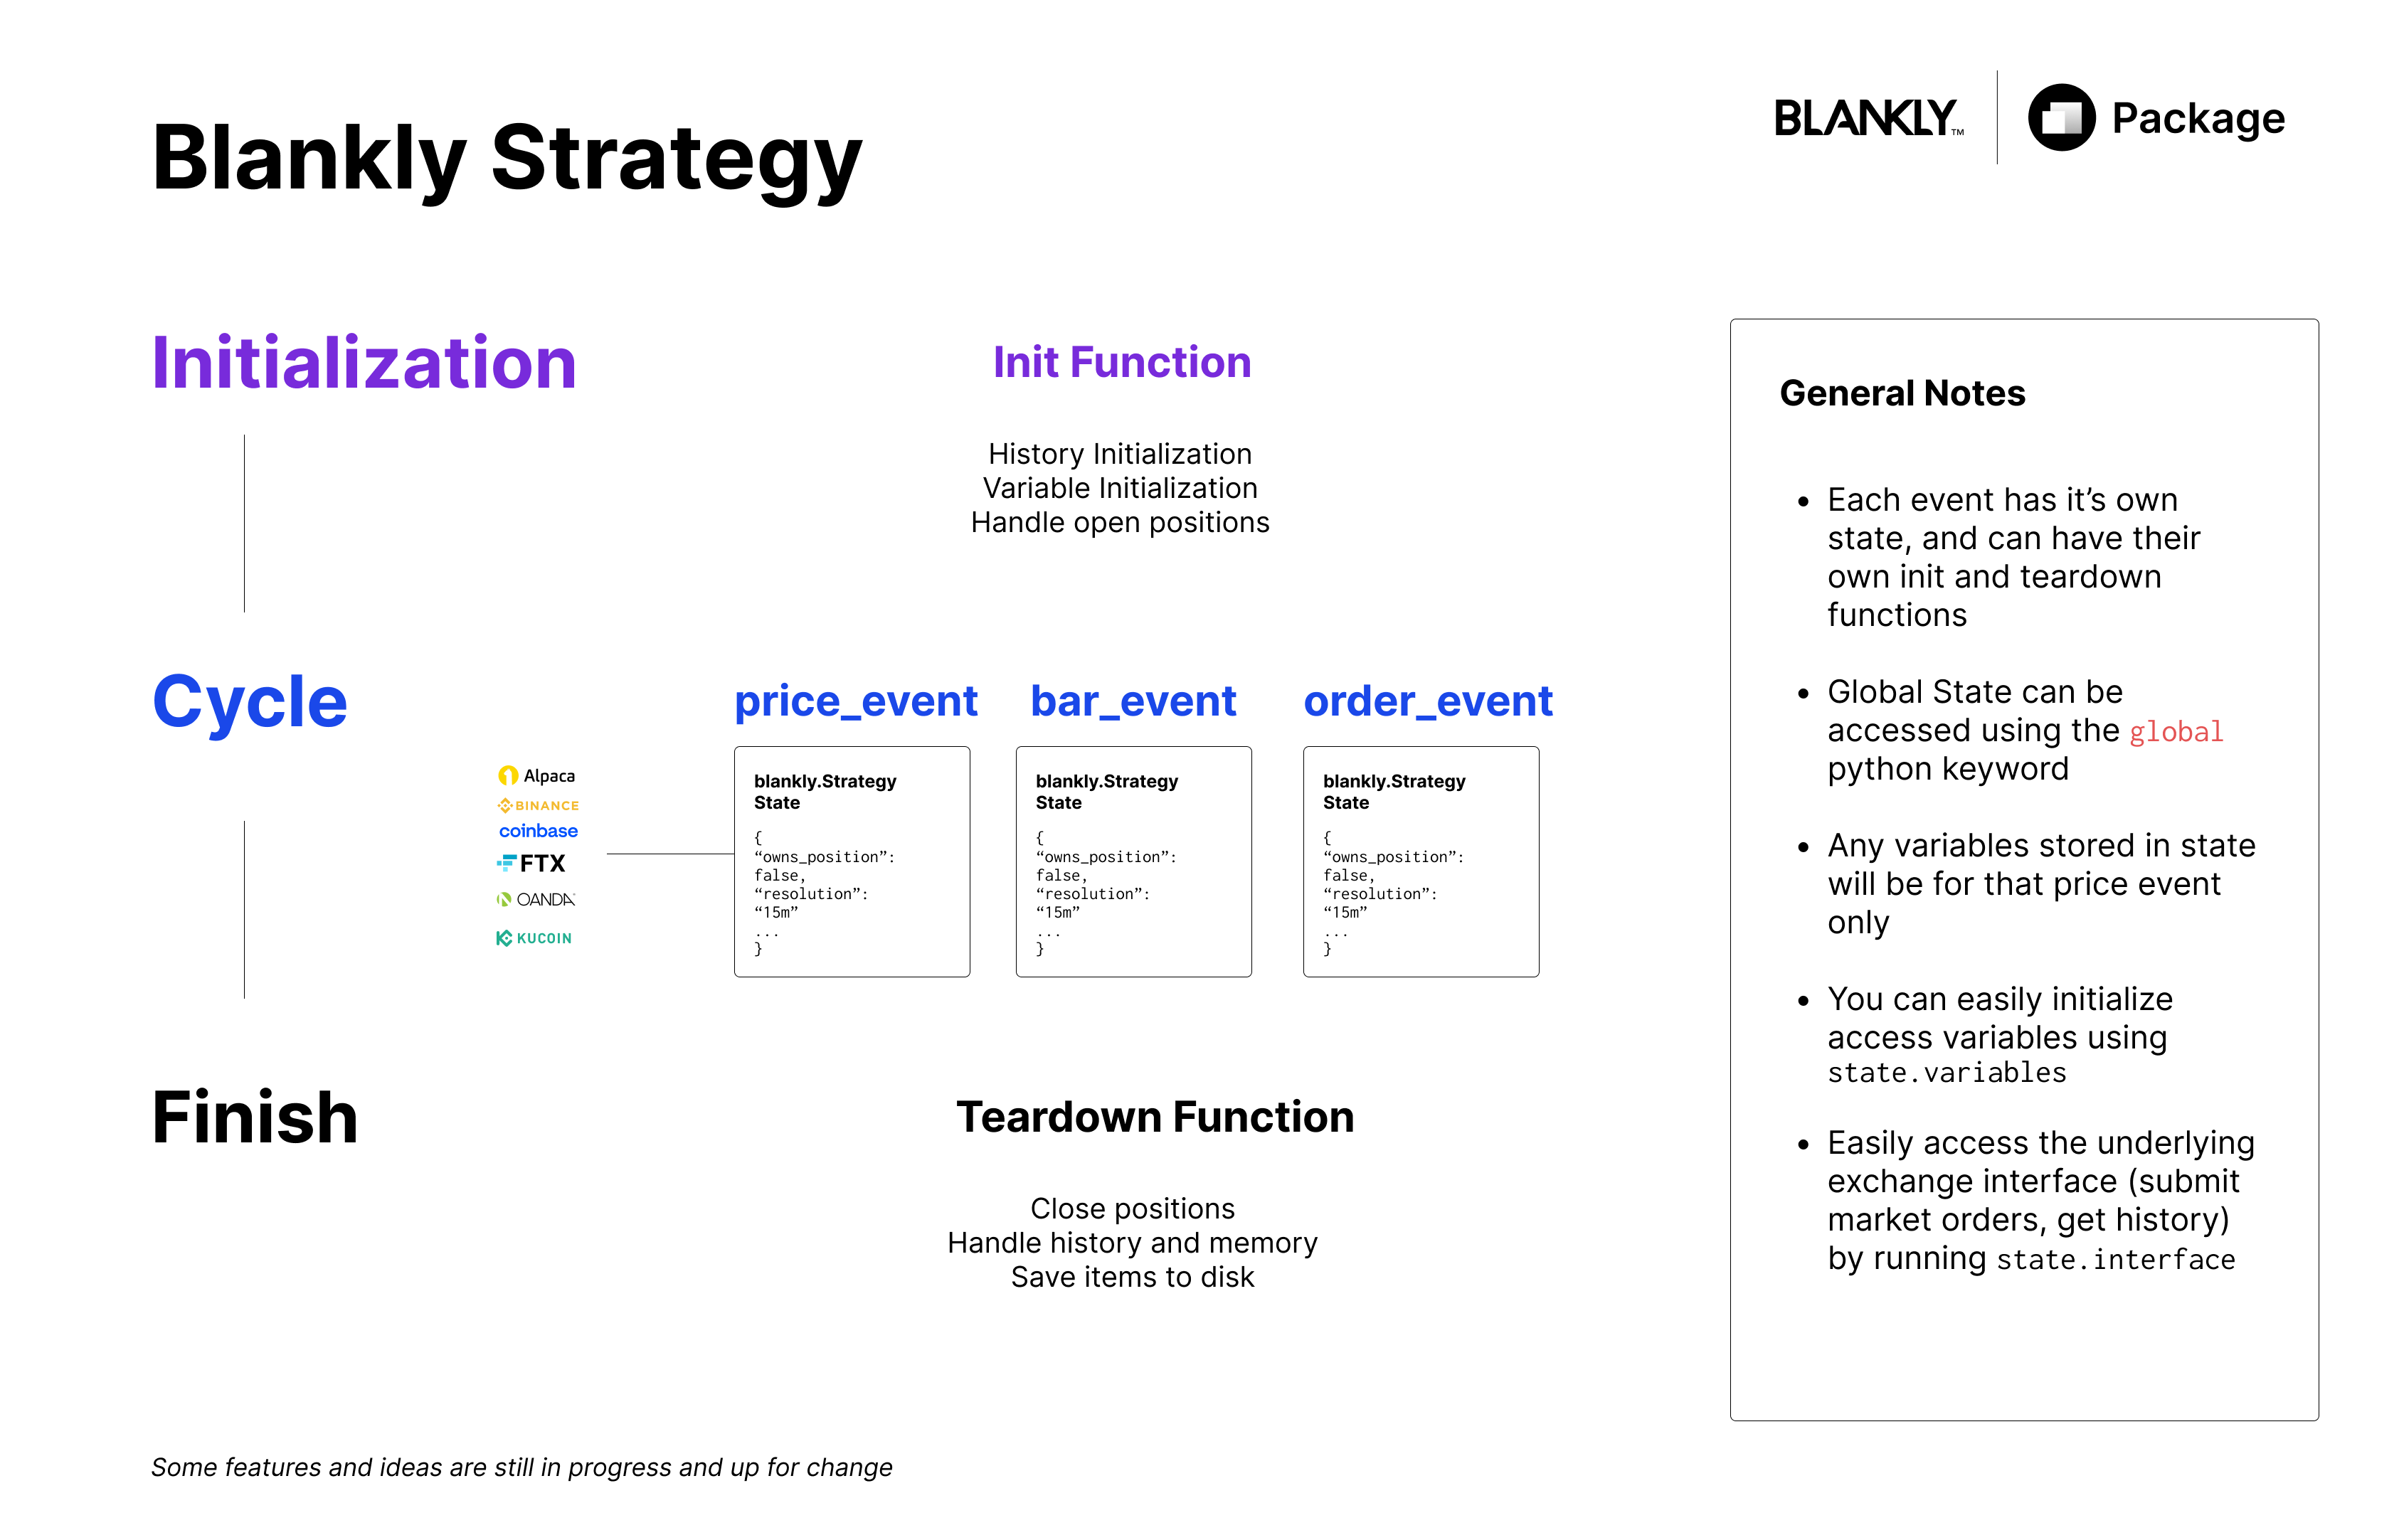
The blankly.Strategy Object
The strategy class is the heart of the Blankly development framework. The goal when developing this class was to create something that could seamlessly integrate with the powerful user-objects that Blankly provides, while also giving an experience that barely goes beyond basic python. This means that functions can be asynchronous and multithreaded without the user ever noticing, while taking advantage of highly integrated exchange interfaces to make model development incredibly clean & simple.
Similar to many modern packages that follow more of a functional and declarative format such as Keras, we wanted to model our Strategy class so that anyone can easily integrate their models and custom price events.
More details, check out the Blankly Strategy Docs
Strategies created using the class can be instantly backtested, paper traded, sandbox tested, and deployed by only changing a single line.
Strategies can have as many price events and combinations as you'd like. You're able to run a single price event on multiple resolutions and symbols and or run many-to-many.
Setting Up Our Python File
blankly init provides us a bot.py but we're going to utilize our own and call it rsi_bot.py
Boilerplate Code
We will be implementing this strategy using Blankly.Strategy that allows for a quick and easy way of building out our RSI strategy. We'll also be utilizing blankly.indicators to quickly implement the RSI calculations.
Create Strategy
from blankly import Strategy, StrategyState, Interface
from blankly import Alpaca
from blankly.indicators import rsi


def init(symbol, state: StrategyState):
    # run on a new price event to initialize variables
    pass


def price_event(price, symbol, state: StrategyState):
    # we'll come back to this soon
    pass


alpaca = Alpaca()
s = Strategy(alpaca)
s.add_price_event(price_event, 'MSFT', resolution='15m', init=init)
s.start()
Initializing Variables and History
In order to speed things up, we should make one call to get the historical data that we need and append data as new prices come in. We can actually easily do this on initialization and make sure the proper data is passed in to the proper price events:
def init(symbol, state: blankly.StrategyState):
    # Download price data to give context to the algo
    # This gets the past 150 data points as a deque to reduce memory usage
    state.variables['history'] = state.interface.history(symbol, to=150, return_as='deque')['close']
    state.variables['owns_position'] = False
Implementing the Price Event
Now that we have the code set up, let's take a deep dive into how to implement this price event.
First, as we recall, we want to buy an entity when the RSI is under 30 and sell when the RSI is greater than 70, we will use a period of 14 (the typical setup) This is a very simple conditional statement.
def price_event(price, symbol, state: StrategyState):
    """ This function will give an updated price every 15 minutes from our definition below """
    state.variables['history'].append(price)
    rsi = blankly.indicators.rsi(state.variables['history'])
    if rsi[-1] < 30 and not state.variables['owns_position']:
        buy = int(state.interface.cash / price) # calculate number of shares from cash
        state.interface.market_order(symbol, side='buy', size=buy)
        state.variables['owns_position'] = True
    elif rsi[-1] > 70 and state.variables['owns_position']:
        curr_value = int(state.interface.account[state.base_asset].available)
        state.interface.market_order(symbol, side='sell', size=curr_value)
        state.variables['owns_position'] = False
Adding it All Together
Now that we've gotten everything, let's bring it all together. Congrats! In just 20 lines of code, you've built a fully functional, backtestable trading algorithm.
import blankly


def price_event(price, symbol, state: blankly.StrategyState):
    """ This function will give an updated price every 15 seconds from our definition below """
    state.variables['history'].append(price) # appends to the deque of historical prices
    rsi = blankly.indicators.rsi(state.variables['history'])
    if rsi[-1] < 30 and not state.variables['owns_position']:
        buy = int(state.interface.cash / price)
        state.interface.market_order(symbol, side='buy', size=buy)
        state.variables['owns_position'] = True
    elif rsi[-1] > 70 and state.variables['owns_position']:
        curr_value = int(state.interface.account[state.base_asset].available)
        state.interface.market_order(symbol, side='sell', size=curr_value)
        state.variables['owns_position'] = False


def init(symbol, state: blankly.StrategyState):
    # Download price data to give context to the algo
    state.variables['history'] = state.interface.history(symbol, to=150, return_as='deque')['close']
    state.variables['owns_position'] = False


if __name__ == "__main__":
    # Authenticate alpaca strategy
    exchange = blankly.Alpaca()

    # Use our strategy helper on alpaca
    strategy = blankly.Strategy(exchange)

    # Run the price event function every time we check for a new price - by default that is 15 seconds
    strategy.add_price_event(price_event, symbol='MSFT', resolution='15m', init=init)

    # Start the strategy. This will begin each of the price event ticks
    # strategy.start()
    # Or backtest using this
    results = strategy.backtest(to='1y', initial_values={'USD': 10000})
    print(results)
Now just run
$ python rsi_bot.py
If you're using Blankly Slate, your backtest should now be visualized in the platform!
You'll also get output in your terminal!
Awesome! We just successfully ran our first model
Deploying It
If you want to test it out, let's put it into a live paper trading environment using Blankly Slate (if you're following with Blankly Slate).
Now all you have to do is run
$ blankly deploy
See the final result that you'll actually get here